Configure Destination- Autoloader
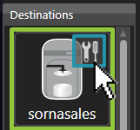
Step 1: Click the Configure Button in the upper right-hand corner beside the Destination Icon.

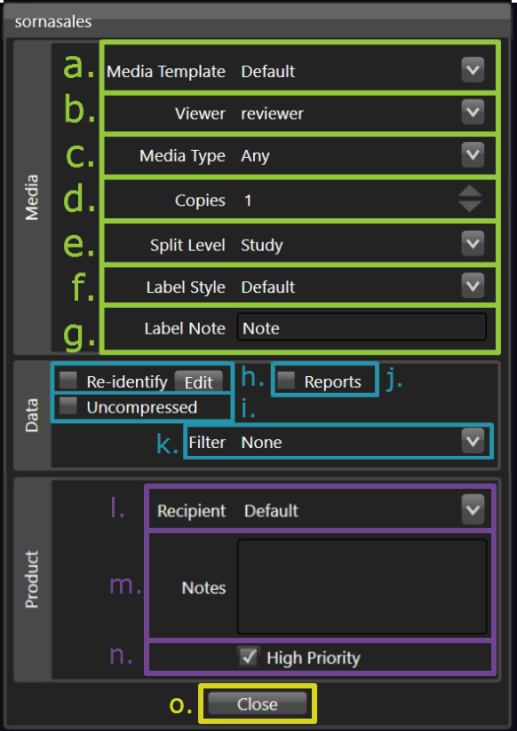
Step 2: The Configure Autoloader Window appears, and each configuration setting is displayed within it. Below is a full view of the Configure Autoloader Window, followed by a key for each labeled section.

a. Media Template
Click the Media Template dropdown toselect a media template from a predefined list set by your facility’s systems administrator.
When a Media Template is selected, the remaining configuration settings are automatically determined.
b.Viewer
Click the Viewer dropdown toselect the desired viewer to embed on the DISC(s) from a predefined list set by your facility’s systems administrator.
c. Media Type
Click the Media Type dropdown to select the desired media type (e.g. Any, CD, or DVD) for the job.
If Any is selected from the Media Type dropdown, the autoloader will automatically select the best media type for the job.
d. Copies
Manually enter the desired number of copies of DISC(s) in the Configure Autoloader Window, or click the Up Arrow or Down Arrow to modify the number of copies predefined in the field.
e. Split Level
Click the Split Level dropdown to select the desired split level for the DISCs.
If there is not enough space on one DISC for all the data in the job, split level determines the level to which the data is split across multiple DISCs. Split level options include:
- Patient: Split by each patient included in the job.
- Study: Split by each study for each patient included in the job.
- Series: Split by each series for each study included in the job.
- Instance: Split by each DICOM instance for each series included in the job.
*NOTE: Studies are highly likely to be split across multiples DISCs if Series or Instance is selected as the Split Level.
f. Label Style
Click the Label Style dropdown to select the desired label style for the DISC(s) from a predefined list set by your facility’s systems administrator.
g. Label Note
Manually enter a note to appear on the DISC(s)’s label..
Label note will only appear if the field has been configured to print on the label by your facility’s systems administrator. There is no character limit in the label note field. However, only the characters that can fit in the label note field are printed on the label.
h. Re-identify
Re-identify, or manually anonymize and / or correct patient information.
Learn more: Re-identify
i. Uncompressed
The data on the DISC(s) is uncompressed if the checkbox is checked.
To compress data on the DISC(s), uncheck the box.
j. Reports
Click the Reports checkbox to include reports on the DISC(s).
k. Filter
Click the Filter dropdown to select a filter option.
Each filter option is predefined by your facility’s systems administrator and is configured to exclude specific series’ (may exclude one or more series) from the DISC(s).
l. Recipient
Click the Recipient dropdown to select a recipient for the DISC(s) from a predefined list set by your facility’s systems administrator.
Lean more: Recipient Encryption
m. Notes
Manually enter the desired notes for reference in the job log in the Configure Autoloader Window.
Notes are intended for future reference by the sender(s) only.
n. High Priority
Check High Priority to place job ahead of others not marked high priority.
o. Close
Upon completion of selection / entry of all desired autoloader configuration settings, click the Close button to exit.
